A common problem that many new hockey players have is learning how to stop. I don’t mean stopping by dragging your foot, doing a 360 or running into the boards, I mean doing a proper hockey stop!
In this article we have four videos to help explain the hockey stop.
I have written this article to help you learn how to stop in hockey, I have also made a how to stop in hockey video that I have added below. You can watch the video if you prefer a visual lesson, I will include key points below the video.
The first video shows the basics of stopping on skates. The biggest part of stopping on skates is getting over the mental barrier. Here is the first video
How to Stop on Hockey Skates Video
This video covers the basics of stopping and helps you understand what is happening.
As you can see in the video the main concept to grasp is that you have to peel the ice, and you will be sliding sideways for a brief second. The most important point to take away from this video is that you MUST keep your momentum moving in the direction you are skating, otherwise you will just turn around. Now you can watch the how to hockey stop video
The Hockey Stop for Absolute Beginners
We made the video below this one first, but we still had a lot of questions so we decided to address all those questions in this video, and offer some very simple solutions to some common problems that beginner hockey players were having.
30+ Years of Power Skating Lessons
In this video we have Scott Grover from the Science of Skating explaining how he teaches hockey players how to stop. Scott was a guest in our Learn to skate series.
How to Hockey Stop Video

Learning how to hockey stop can be tough, but by learning the proper technique, taking it slow, and practicing a lot you should be able to learn in no time! Here is the process of stopping in hockey
A player starts by skating forwards, when the player is ready to stop they will lift one leg slightly to take weight off of it (this can become the back leg or front leg but for the purposes of this example this will become the back leg). With a bit of weight taken off of one skate, the player will start to lean back, rotate their hips and shoulders and begin to turn with their other leg (this leg becomes the front leg). When the player has turned their front leg approximately 90 degrees they will now plant their back leg about 1 foot behind their front leg. At this point the player will be leaning back, and keeping the momentum moving in the direction they were skating. With both feet planted the player will slide for a brief second before coming to a full stop. This sounds like a lot to learn and a long process, but it happens in less than a second. You can see this process in action in the video above if you would like. I have also added pictures of how the hockey stop happens below.
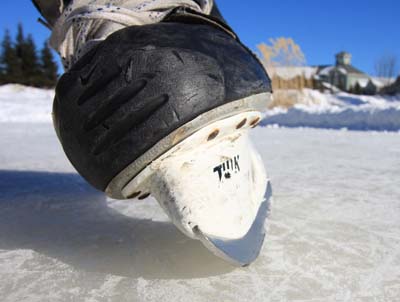
Hockey Stop – Start

You can see here that I am just finishing my last stride from skating, and now preparing to stop. I am pushing off with my back leg (left leg) and getting ready to land with my front leg (my right leg).

Hockey Stop – Rotate Hips
You can see that I have pushed off with my back leg (my left leg), landed with my front leg, and now I am beginning the hockey stop. I am starting to rotate my hips, and turning my front foot. At the same time I will be leaning back, and bringing my back leg behind my front leg.

Hockey Stop – Planting Your Feet
I have now rotated my hips a bit, turned my front foot enough to begin stopping, and just starting to plant my back leg. the back leg is used for balance, and also a bit for stopping. Most of the weight will be placed on the front leg. The key here is to lean back (so you don’t topple over) and peel ice. To stop you will be using the inside edge of the blade on your front skate, and outside edge of the blade on your back skate. I will pivot both of my skates just a little more, then really lean into the stop.

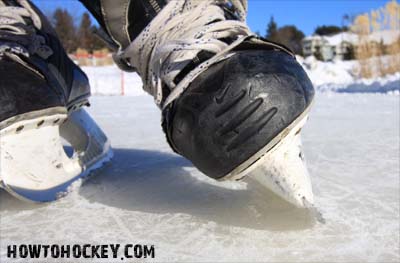
How To Hockey Stop
Here you can see the stop in action. I have peeled a lot of ice with my front leg and a bit with my back leg as well (hard to see though in this picture) The key is to keep moving in the direction that you are skating. If you have trouble stopping like this (you keep spinning or going in circles) try some of the drills I mention in the video, or in the article below.
Now that you know how a hockey stop happens I will teach you how to do it.
Learning To Stop in Hockey
- The biggest obstacle in learning to stop on skates is the mental barrier that people put up. In the video and in this article I show you how you can overcome the mental barrier of stopping on ice. As you become more comfortable with the concept of how to stop on skates you will get better and better.
- Start slow – Start skating slowly, and stopping slowly, in fact at first you will only be using one leg to stop, not both. If you are just starting, try holding onto the boards and just pushing off with your leg and get the feeling of your skate sliding sideways. Then move onto the next point
- For your first hockey stop, take a few strides to get moving, glide for a second and make sure your balance is right. Now Lift a bit of weight off of the skate of your strong leg, rotate your hip a bit, turn your skate (of the leg that you just lifted) about 90 degrees (so it is almost perpendicular to your other skate) and plant your skate in front of you. Your strong leg should now slow you down and then stop you. You should use your other leg for balance. Practice doing this until you get used to using the inside edge of your strong leg to stop. If you feel comfortable at stopping like this then increase your speed a bit, practice doing it faster and faster until you have it down. Remember to practice stopping with both legs, in hockey you need to be able to stop with your body facing in both directions, so start practicing it now. If you can stop like this you are halfway there.
- You now know how to use one foot to stop, and the other for balance, with a hockey stop you should be using both feet to stop, but you are not ready to do that just yet, first you should practice stopping with only one foot! That’s right one foot and it is not as hard as you think. Earlier we were using one foot for balance, but your front leg was doing all of the work. Now we need to build your balance even more by taking away that leg you were using for balance. Perform the same motion as we talked about before, but take a bit of weight, or all of your weight off of your balance foot, try just using your front leg (your strong leg) to stop (as shown in the hockey stop video). Once you are comfortable taking weight off of your balancing leg, try lifting it right up. This will build your confidence in using your inside edge to stop, and the motion of sliding a bit, and keeping the momentum moving in the direction you were skating. That is pretty much it, now you can use both feet and do a full hockey stop!
- To do the full hockey stop, skate forwards, lift your strong leg, rotate your hips a bit, lean back, and turn your body to the side so that both skates are now sideways (compared to how they were pointing before). Plant your back foot and dig in until you stop. Congratulations, you have just learned how to hockey stop. The only thing you need to do now is put that knowledge into action.
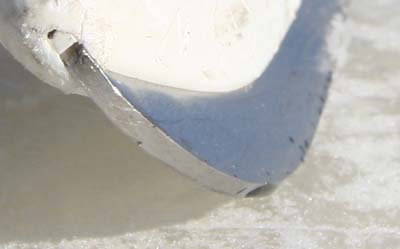
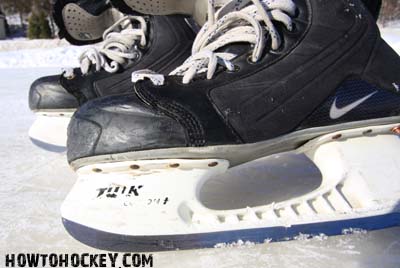
Understanding Your Edges
As requested by Jacky – If you have read our How to Ice Skate article you will know that when you are skating, each skate blade actually rests on two thin edges. When you skate, turn, and stop you need to use your edges. When you are playing this comes as second nature, but can be hard for some beginners to understand, and may help you learn to stop and skate if you learn about your edges. I have included some pictures that may help you understand how to use your edges to stop.
I hope this article has helped you learn how to stop in hockey. If you would like more hockey tips like this then you can subscribe to the articles with the box to the left.
Thanks for reading, let me know what you think (or add some tips of your own)
Sample lesson on “Snow Plow Stops” from our Level 1 Skating course on The Pond
If you’re looking for more ways to improve your hockey skills, check out The Pond. The Pond is our all in one hockey training platform designed to continually challenge players. We provide you with the most efficient path to improve the skills you will use the most in game. Use coupon code TRYOUTS to get your first month 100% free!