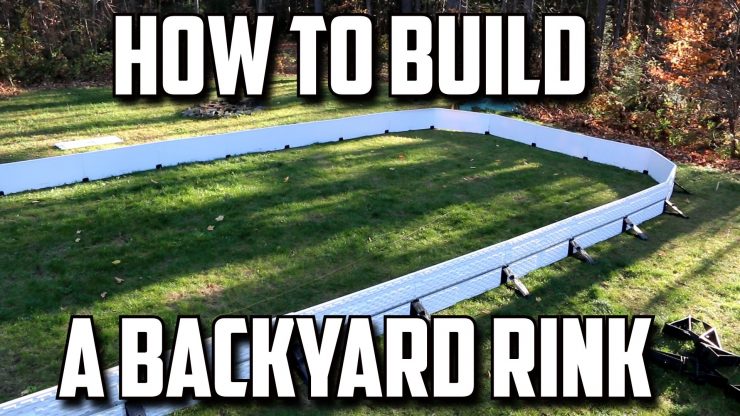
The Quick Explanation of building a rink
The best way to build a backyard rink that will give you the most skating time, and require the least amount of maintenance is to basically build a temporary above ground pool. The basic components you need are brackets, boards, and a liner.
Brackets and boards can be purchased from a backyard rink company (more expensive, but easier in the long run), or improvised from your local hardware store. The liner should be purchased from a backyard rink company as quality does matter here. Of course you can forgo the liner, however this will cause a lot of headaches in climates that don’t see consistent below 0 temperatures until January.
Where to buy Backyard Rink Supplies
Some of the most common supplies for a rink are brackets, boards, a liner and a handheld “Zamboni” to flood the ice. I have included two good resources below
- YardRink – A new entry to the backyard rink market and they are coming in with some smart changes. The liner goes OUTSIDE the boards to protect it from tears, give better board play, and reduce waste (the liner can be re-used every season). This also means more savings (you don’t need to buy a new liner every year) and much less plastic waste. Check them out here and if you’re looking for a discount code use Yardrink coupon code JEREMYTEN for 10% off (can be combined with other coupons!)
- EZ ICE RINKS – By far the easiest rink kit, a single person can build the rink with no tools in under an hour. If you use the EZ ICE RINKS promo code HOWTOHOCKEY you can save 10% and get free shipping
- Iron Sleek – They’re a 1 stop shop whether you want to build your own rink and order their brackets and liner, or get a full kit. They just released their drop-in rink kit that is easy to assemble. Use the iron sleek coupon code COACHJ for 5% off and a free shovel!
- HockeyShot.com Backyard rink kit – You get the brackets and liner for a 20ft x 40ft rink, you will need to purchase boards (plywood can be used). The rink can be expanded later with more brackets and boards and a bigger liner. Use our coupon code HOWHCKY001 for $10 off
- Nicerink.com – You can buy everything you need
- The article below – Joe provides very good instructions on how to build your own rink, and has a lot of good knowledge to pass on. He also has links to his store where you can purchase supplies
Thanks to Joe from backyard-hockey.com for writing this guest post
Building your own backyard hockey rink
For a quick explanation we have shot two videos below. You can also read the article below for more details
As any hockey player knows, having an open sheet of clean ice is a rare and beautiful thing. I can remember back in high school, our team practiced right after school ended each day. As seniors, we’d set up our class schedule to have the last period free, meaning we could get to the rink with a full hour to go before practice officially started. To be the first one on that perfect afternoon ice was to have heaven all to yourself — to breathe in that beautiful rink smell, to feel the cold air sweep by your face, to be the first to carve ice with steel. In those solitary minutes, everything was right in the world. Before long, the ice was crowded with teammates and coaches, the structure of another practice in full swing, the perfect open ice gone for another day.

I didn’t build my first rink until I was 28. I wasn’t quite sure what I was doing, and I was a bit nervous, but when the boards were up and the liner was in and the water truck was parked in front of my house, I knew it would be incredible. And it was. A few days after we filled, the ice hard and my two-year-old son asleep, I turned on the floodlights and snuck out back, Bauers slung over Sher-Wood. I tied the cold laces and stood up. For the first time in a decade I felt the rush of clean, smooth, untarnished ice, the same feeling that had me sprinting for my car each afternoon as a teenager. The ice was mine and mine alone, just as it was then.
Building and maintaining a backyard rink is hard work, and nobody who has done it will tell you otherwise. But I’ll stop short of saying it’s difficult — and there is a difference. Chopping firewood and shoveling snow is hard work. Calculus and brain surgery are difficult. That’s to say that with proper planning and good instruction, everyone reading this can build a rink in their backyard. You just need to do a bit of homework first.
For all intents and purposes, a backyard rink is nothing more than an above-ground swimming pool, albeit one with only a few inches of water. When it comes to how to build it and what to use, there are literally thousands of variations, each rink as different as the person who builds it. But each one shares three common (and mandatory) components: boards, bracing, and a liner. Some folks in very cold climates will pack down snow and flood it, using snowbanks as boards. I don’t live in a climate that supports that, so I won’t be talking about that here. But what I will give you below is a rough idea of how most people I know build their rinks – me and my customers included.

Before we get into the materials, you’ll need to determine if your yard is suitable for a rink. I wrote a post on this process recently, but I’ll summarize it for you. The way to do this is by using wooden stakes, string, a line level, and a tape measure to determine your yard’s slope. Start by staking out the four corners of your would-be rink, visually determining which of these four corners is the high point. This will be the corner of your rink with the least ice thickness — we shoot for 4″ at a minimum. With your string tied to this stake 4″ off the ground, run the string to a different corner, attaching your line level to the middle of the string. When the string is level, measure how far off the ground the string is at the second stake. If your high corner is 4″ and the string is at 10″, then you know you have a 6″ slope and that your ice will be 10″ thick at this corner. Repeat these steps for the other two corners, making sure to write your numbers down. Once you know your water depth around the entire rink, you can move on to the rest of your build. (Note: many new rinkbuilders opt to skip this step, often saying “my yard looks level”. I hear this every year, and many of these people are surprised when the water is running over their deep end boards while the shallow end has exposed liner. Don’t be one of those people — they tend to have angry and disappointed kids.) Need more detail? Here’s a blog post on the process.
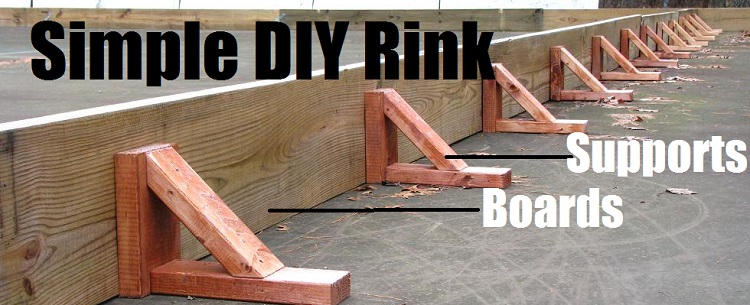
The Boards
For the most part, you’re looking at using one of three options: plywood, two-by lumber, or backyard rink specific boards like the thermoplastic pieces made by Nicerink. Which option you choose depends on things like budget, availability, and the aforementioned water height. For example, if your water height is 25″ in your deep end, then you won’t be able to use the Nicerink boards (which are 18″ tall) or 2x lumber. But if you’re lucky, and your yard cooperates, you have a choice to make. The Nicerink boards, part of a collection of Nicerink products made specifically for backyard rinks, are the best money can buy, and will last decades. But they’re not cheap, and so many rookie rinkbuilders opt for plywood or 2×12 lumber. The 2×12 (or 2×8, or 2×15, or…) lumber is thick and sturdy, but is heavy and not easily stored in the offseason. The plywood is inexpensive and easy to cut into strips, but tends to flex more and won’t last as long. So while all three kinds are viable and used throughout the backyard rink community, one may suit your yard, budget, and needs more than the others.
The Bracing

A rink is only as good as the bracing used to support it. In general, water HATES being confined inside a backyard rink, and so when you fill your rink, that water works hard to push your boards outwards. It’s the bracing you use on the perimeter of your rink that keeps the water in and allows it to freeze. What you use to brace your boards is a function of the board material you chose, your slope, and your budget. Nicerink makes a triangular bracket with 6″ spikes along the bottom which are great because they accept Nicerink boards and 3/4″ plywood. Others have used wooden stakes, rebar, homemade triangular brackets, 2×4’s pressed up against the boards at a 45-degree angle, or even fence poles. A search online will yield dozens of designs, and it’s impossible to rank one over the other. For the most part, we advise that you put your bracing every four feet around the perimeter of the rink unless your water is more than a foot deep. If it’s deeper, make it every two feet. But there’s a rule I subscribe to, and that’s that there is no such thing as too much bracing. There IS such thing as too little. So err on the side of caution, particularly in your first year, and brace the ever-living crap out of your rink. It beats the alternative.

The Liner
The third component of your rink is the liner. I sell Nicerink liners (and use them on my own rink), but I’ve found that most communities will have a handful of places that sell tarps or sheeting suitable for rinks. The important things to note are thickness (thicker is better) and color. Ideally you want white or clear, because anything dark (like those blue tarps) will attract the sun and impact your ice quality.
Everything Else
As I said earlier, the boards, bracing, and liner are the three most important things you’ll need to build your own rink. But there are dozens of accessories available to enhance your experience. Most of my customers opt for yellow foam bumper caps, which help keep the liner in place while you fill and provide a soft, safe surface atop your boards. Lighting is another thing to think about, and it doesn’t have to be fancy. I have three work lights (the same kind you get at a home improvement store) attached to 2×4’s. You may not think you’ll skate at night, but the lights certainly help when it comes time for resurfacing. And that’s another thing you’ll want to think about getting: a resurfacer. Nicerink sells one (of course), and it’s a beauty, but there are instructions for building your own on my blog for a fraction of the cost. Regardless of which one you choose, using a resurfacer is the best way to get indoor-quality ice.
The Build
When I build rinks for my customers, I break my services into three visits, and they mimic the work you’ll need to do each season. The first is the frame build, which you’ll want to do before the ground freezes. This is because you’ll want to make sure you can pound your bracket of choice into the ground. Many people do this step between late November and early December.
The next step is the liner placement. You can’t really schedule this step, as it’s entirely weather dependent. You’ll need to look at the long-range forecast for your area, and target a cold snap that is 20 degrees(F) or colder at night and 32 degrees (F) during the day. Then, and only then, will you unroll your liner, carefully position it within your rink, and start to fill. Some tricks for this step:
-When you unroll your liner, make sure it’s flush against both your boards and the ground all around the perimeter. If it’s not, the water pressure could tear the liner as you fill. Order a liner large enough to drape over the outside of your boards, allowing for plenty of slack as you fill.
-Don’t EVER staple your liner to your boards before you’re completely full. Uuse the bumper caps, or inexpensive spring clamps, to hold the liner in place on fill day.
-Have some extra board material and bracing on hand the first time you fill. In subsequent years you’ll know what to expect, but whenever I build a new rink, I keep extra brackets or wooden stakes on hand in case I notice any board flexion as the water level rises.
The last step is rink teardown, which you’ll want to do as soon as the last bit of ice thaws. This is a sad but necessary job, particularly if you have grass underneath that you want to grow. Some people will roll up their liner and reuse it the next year. I’m partial to buying a brand new one so I don’t have to worry about holes when I go to fill the second season. It gives me peace of mind.
So while it would take me 10,000 words to tell you all I know about backyard rinks, this is a good summary that will work for just about every yard and budget. I have also summarized the tips below
Ten Tips for Having the Perfect Backyard Hockey Rink

- MEASURE YOUR SLOPE FIRST! People who say “my yard is pretty flat, I don’t need to measure” are the same ones who end up with water gushing over the boards in their deep end while their liner flaps in the wind at the other end. Check your slope and know for sure where your water line will be when you fill. This is the single most important step to building a rink
- When planning the location of my customer’s rinks, these are the four things I look for: a flat spot near the house, near an outdoor water source, not over the septic or leach field, and a place with adequate outdoor lighting (or the ability to add it).
- Don’t skimp on your bracing. I’ve seen pictures of thousands of rinks. I’ve never once said “wow, they really could have saved $50 by using less bracing”. Brace your rink to withstand nuclear fallout and never worry about a catastrophic failure.
- Don’t put your liner down until you’re about to fill, and don’t fill until you’re staring at below-freezing daytime temps (colder at night) for the next week. If you put your liner down and fill too early, you risk punctures from tree limbs and adventurous animals bathing themselves in your pond.
- Fill all at once, and use a water delivery service if you can spare the couple hundred bucks. Don’t try to fill in layers because you could jeopardize your liner. If you put down one inch of ice first, then try to fill again, the new water will bore a hole in your ice and fill from the bottom up. This will push up that first layer of ice, which could damage your liner. Avoid this by filling all at once.
- If you notice a hole while filling, hurry up and patch it. Acoustic sealant, roofing tar, and Nicerink patch tape work best. If you’ve planned it right and it’s cold as hell out, the top layer will freeze quickly. Get your patching material in there before it does, or else you’ll have to punch through the ice to get down to the liner.
- To get the best ice surface, think like a Zamboni. The Zamboni sweeps and collects the snow first — you’ll do this with a shovel, snowblower, broom, or squeegee. Then the Zamboni lays down a layer of hot water. For your rink, use a homemade homeboni (like this one) or the NiceIce resurfacer from Nicerink. Hot water is best, but cold water works great too. Unlike your initial fill, your goal when resurfacing is several thin layers. And don’t forget to bring your hose and resurfacer inside after you’re done.
- Make sure you have adequate lighting around the rink. You may not think you’re going to skate much at night (particularly if your kids are young), but you’ll need the light to do your rink maintenance. It’s colder at night, making it the best time to resurface.
- Snowstorms are inevitable. Do your best to keep the rink clear. Waiting until the storm is over is ok, but get to the rink quickly. The snow acts as an insulator and actually bonds to the ice. This can ruin your surface if left along long enough. You can get it back with several floods, but it’s a pain. Best to shovel early and often.
- You won’t damage your grass if you get your liner up early. As soon as the ice melts in the spring, drain it using either a submersible pump or a simple siphon. Once it’s empty, cut the liner up into strips and dispose of it. Then get a new one the following year and start all over again!
DIY backyard rink vs Backyard rink kit
If you don’t have a lot of time, tools or handyman experience you can always pick up a backyard rink kit. These kits come with boards, brackets, and a liner, so all you need to do is assemble and add water.
The easiest rink to build that I’ve tried is the EZ ICE RINK, you don’t need any tools so it doesn’t take much effort, and you don’t need to hammer every steak in the ground so set up is very fast (under an hour). You can use promo code HOWTOHOCKEY to save 10% on your order
Some other options are NiceRink and IronSleek (Use the iron sleek coupon code COACHJ for 5% off and a free shovel!). NiceRink has been in the business for years, their bracket anchors into the ground giving a lot of support to the boards. Ironsleek has a bracket system that can be used with plywood which is more cost effective and just released the drop-in rink system.
How to build a backyard rink (2020 edition)
Looking for a way to keep your kids busy playing hockey on your new backyard rink? Check out The Pond. The Pond is our all in one hockey training platform designed to continually challenge players and keep them busy. We provide members with the most efficient path to improve the skills they will use the most in actual games. Use coupon code TRYOUTS to get your first month 100% free!