As a hockey player it is important to practice shooting and stickhandling on a regular basis. The big problem that most hockey players have though is finding a suitable surface to stickhandle and shoot off of.
The biggest problem with shooting and stickhandling on pavement or asphalt is the increased friction. This friction causes the pucks to move slower, and flip all over the place (very annoying). The friction also causes your stick blades to wear out pretty quickly (costs a lot to keep buying blades, or sticks)
Shooting and Stickhandling Surfaces
 A great solution is to find a nice smooth surface to shoot and stickhandle on. I have tried a lot of alternatives, but I find each cheap alternative will have a downfall in one way or another. I think that if you are serious about improving your shooting and stickhandling it is important to find a good surface to practice on.
One product that we have reviewed in the past was the hockey shooting pad we also did a video review of the roll-up shooting pad which I really liked. I think the roll up pad is the best option for a small area.
Dryland Training Tiles
We were sent a few boxes of training tiles from hockey shot for review. Here is some information about the training tiles from the hockey shot website (with our comments in brackets)
- Slipperiest & smoothest material available for stickhandling,
 shooting & passing! (we’ll see about that)
 - Each tile measures 18” x 18” tile (2.25 square feet) and are 1/2″ thick.
-
Comes with 2 beveled edge pieces for easy loading of pucks.
-
Tiles easily attach to each other. Assemble entire hockey flooring area in minutes! (more on this in the review)
-
Perfect for your garage, basement or driveway.
-
Tiles are strong enough for cars to park on, perfect for the garage. (Oh I have to test this out!)
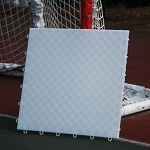
Quality of Material
The tiles are very sturdy feeling, on the top they feel very smooth, and on the bottom they have a cross pattern across the entire tile. The tiles are not overly rigid, and it doesn’t seem like they would break or shatter with a slapshot (time will tell)
Setting up the Hockey Training Tiles
This was pretty easy, it took me a little while to figure it out, but I got it. I thought there was a special way to snap them together, but all you need to do is put the clip side over the ring side and then bash press them together. Each box has 10 tiles, and the tiles measure 18 inches by 18 inches, I set each box up as two rows of 5 tiles.

I would say 5 boxes would be enough for most areas like a garage or basement. It gave me a lot of room to stickhandle and practice dekes. I also added a few more toys from hockeyshot to give me a bit more to do.

On the right side is the attack triangle which is a substitute for a defencemen, and on left side, in the corner, we have the pass master. The passmaster will feed the puck back to you if you pass into it. We also have a weighted hockey puck, and a Green Biscuit which is my favourite off ice puck! Check out the video to see them all in action
Stickhandling and Shooting on the Training Tiles
Stickhandling
I practiced a variety of moves on the shooting tiles, first I just did some basic stickhandling with a regular hockey puck, then moved on to quicker dekes, and toe drags. The tiles held up well too all of my abuse, I was darting back and foreth, moving the puck quickly in all directions and taking a few quick snap shots to finish the move off. The tiles did not come apart at all and most importantly, the puck did not get caught on any edges. I was really impressed at how smoothly the tiles fit together
Shooting
I was told that you can drive a car onto the tiles and they will not break, so they better be able to withstand the force of a stick while taking a slapshot (I tested both :D) With 5 boxes of tiles there was plenty of room to take a wristshot, snapshot, and slapshot. I took a bunch of slapshots and did not feel the tiles move at all, and there was no damage either.
Compared to other products
I really like the roll-up shooting pad which is 4 feet wide by 8 feet long and costs $99. With the roll up shooting pad you get the most shooting and stickhandling area for your buck. A box of 10 training tiles costs $109.50 (use our coupon to get $10 off) and gives you 3 feet by 7.5 feet, but the big advantage to the tiles is that you can buy more down the road and increase the area.
Score sheet – Overall Thoughts
I think that these tiles definitely live up to expectations.
- They were nice and sturdy
- They fit together nicely with no raised edges
- The puck and the Green Biscuit slid very well
- Easy to set up
I would recommend these to anyone who has a garage, basement, or flat open area and wants to start a cool place to practice stickhandling and shooting. Only one question remains though…. can you drive a car on it, you will have to watch the video to find out!
Hockey Training Tiles Video Review
In this video we test out the training tiles and show you how well the pucks slide, how to set up the tiles, and if we can park a car on them
Where to Buy the Training Tiles
I always get a comment on every review asking where to buy the product (even though I link to it about 5 times in the review) so I am making a nice big section called where to buy. You can buy the tiles on this page at hockeyshot