In previous articles I’ve written about the roles of a winger, and the roles of a centerman.
In this article I will be going into detail about the roles and responsibilities of the Defensemen. I’m going to start by making it VERY simple, and then we’ll go into a little more detail based on zones.
The responsibilities of the defensemen
Your basic duties as a defensemen are to keep the other team from getting good shots on your goalie. There are many other roles you will play, but all of them lead back to this. A good defenseman will:
- Maintain good defensive positioning (stay between the puck carrier and the net)
- Battle in the corners
- Protect the front of the net
- Initiate breakouts from defensive zone
- Make clean crisp outlet passes
- Be a great skater (especially backwards)
- Have a good shot from a distance
- Control the play when the other team has the puck (angling, steering)
- Block shots
- Communicate well with team mates
- Evaluate the play and try to control the opponents moves
- Make quick decisions
This is a list of some of the main qualities of a good defensemen. Defense is a thinking position so if you like to hang back, read plays, and control decisions it may be for you.
Lets get into some more details of the positioning and duties in each zone
Defensemens duties and positioning in the defensive zone
The defensive zone is where all eyes are on the defense. Defense is played in pairs (left D and right D) and in the defensive zone it is crucial to work with your defensive partner and cover your own zone. The best scoring opportunities for the other team will happen when a defenseman is pulled out of position. There are two areas that the defense will find themselves the most. The corner, and in front of the net. Lets talk about the “zones” first
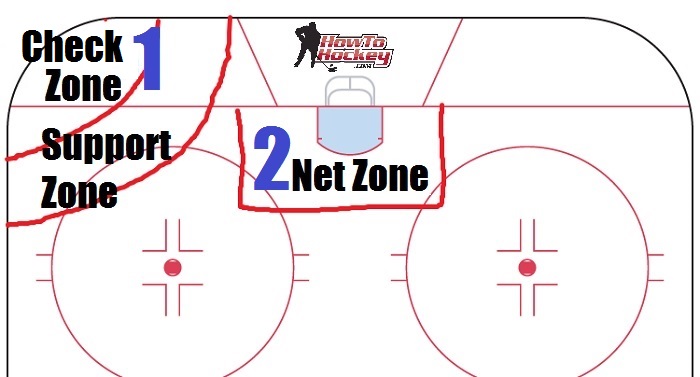
Check Zone, Support Zone and Net Zone
As a defenseman, these are the zones you need to know about. In this situation we will assume the puck is in the right corner (left corner in the picture, but right corner of the rink for the defensive team) The check zone is the area within 5 feet of the puck carrier, usually the defense plays in this zone. The support zone is about 5 – 15 feet from the puck carrier, usually the center stays in the support position. The net zone is about 10 feet out from the net, and we ALWAYS want at least one defenseman responsible for this area.
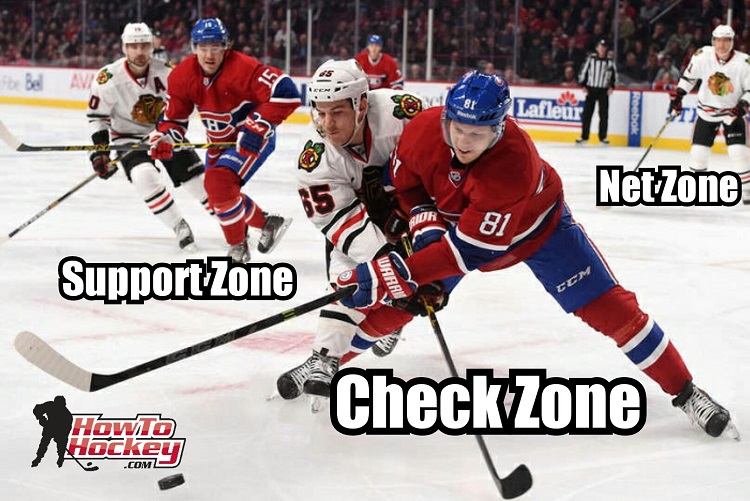
The Check Zone
When the puck goes into the corner, the defenseman responsible for that side should be the first on the puck. You need to get your feet moving fast and win puck races. If you can beat the other team to the puck and win possession you can start a breakout. Being first to the puck is very important for a defensemen, but if you’re not first then you need to know how to fight for the puck!
This is usually called the hit zone because it’s where you engage in contact with the puck carrier, but I’ve changed it to the check zone.
Why the Check Zone and not Hit Zone?
The hit zone suggests you are going to hit the player, but a check is not a hit. A check refers to angling, lifting a stick, poking the puck, pushing and contacting the player without throwing a full on body check. Not all leagues permit contact (a full body check) but even in “non-contact” hockey, a certain level of contact is allowed. It’s generally OK to push, shove, nudge, and bump for the puck, and this is what happens in the check zone. Keep your stance low and wide, get in the corner, lift sticks and tie up the puck carrier. Below is a rule you should memorize
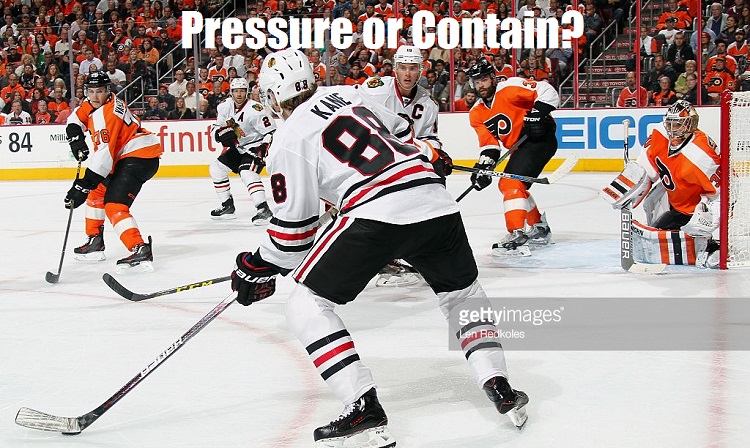
Pressure or Contain?
Pro Tip – “If you can see the players eyes, contain them, if you see their numbers, or they bobble the puck, pressure them”
Contain – You don’t always want to go balls out to towards the puck carrier. This can leave you looking a little silly, especially if you’re going against a player who can control the puck well. If they have good possession, (or you don’t have good support) just contain them. Try to take away passing lanes, get your stick lined up with theirs so they’re always in a low percentage scoring area (don’t let them walk in front of the net), force them to make a pass (hopefully a bad one), or cause them to lose the puck (then you pounce). Good containment can lead to pressure.
Some coaches may prefer to always pressure, but this usually only works when everyone on your team can skate and check, and they all understand and play a system.
Pressure – This is when you leap into action in an attempt to get the puck. You have to think and act fast to decide when the right time to pressure is. Typically when you see the other players numbers, they can’t see you, so you should go in and surprise them quickly and try to strip the puck.
You can apply light pressure to players even when they are in possession, this is when you should be angling them and blocking passing lanes. There are two good ways to angle a player, you can angle them into a low percentage scoring zone or to their backhand. Most players are weaker on their backhand, so if you force them along the boards to only be able to make a pass out on their backhand, you increase the chance of them losing the puck or making a bad pass.
The last scenario when you can pressure hard is if the puck carrier loses the puck. Act quickly, tie up their stick, get good body position, and then grab the puck.
Here is a video that will help explain and demonstrate board play for defensemen.
The Support Zone
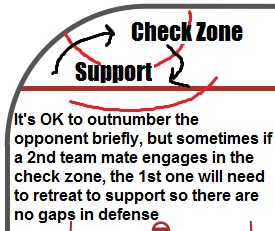
The defense will sometimes find themselves in this zone. You’ll be in a support position if you were NOT the first player on your team to the puck. Sometimes the centermen will get there first, that’s fine, let them battle and back off a bit to offer support. When in support you have two jobs, help out if needed in the corner AND have your head on a swivel to cover a player if needed. If your centermen loses the battle, it’s now your job to contain while the centermen recovers. This means their team has the puck and is looking to make a play, so you need to know where the open player is (the one your centermen normally covers) so you can stop a pass out to them.
You can rotate from the support zone into the hit zone – Your position is not set in stone. A good team knows when to swap spots. We DON’T want to have two players in the hit zone for too long, momentary 2 on 1’s are fine, but if a new team mate enters, the other should be ready to back off and enter the support zone.
The Net Zone
This is probably the most important zone for the defense. We always want one defense here, but it’s OK to have two in close proximity. Just outside of this zone is the high percentage scoring area. In the high percentage scoring area we want to always outnumber the opponent.
I have two simple rules for defensemen in front of the net. Head on a swivel, and don’t let the other teams sticks touch the ice. I see defensemen get pulled into the corner and unaware of an opponent that is now wide open in front of the net. With your head on a swivel you will recognize this threat, and stay assigned to your #1 role, protect the front of the net.
My second rule is to keep the other teams sticks off the ice. This rule is in place because many times a loose puck is bouncing around and both players go for it. If the forward on the other team gets to the puck first it could be in the back of the net, however if the defense plays the body and lifts the stick, he takes away the scoring opportunity. I know it’s not possible to ALWAYS lift the other players stick, but having that thought in your head helps you make better plays.
The Break Out
Breaking out of the defensive zone happens when your team regains possession of the puck and exits the defensive zone. Typically puck recovery happens deep in the defensive zone which leaves the defense in charge of initiating the breakout. We can’t always have a perfect breakout, but sometimes the situation allows for it and we can have a breakout formation (most commonly right after the puck is dumped in).
The biggest things to remember on the breakout are to make a hard and accurate first pass, support your defensive partner, and stay in good defensive position if the breakout fails.
The main types of breakouts are the rim, reverse, up, wheel, and over. For more details on the breakout and these formations you can read my article the 5 breakouts every hockey player should know
Defensemens duties and positioning in the offensive zone
The offensive zone is pretty simple. Keep the puck in, keep the other team from breaking out, and put the puck on the net. Of course there is more to it than that, but for the purpose of this article I’ll keep it fairly straight forward.
Playing with your partner
It is very important to play in tandem with your defensive partner in the offensive zone. If you are not moving together it opens up kinks in the armour, and can allow for some odd numbered rushes for the other team (2 on 1, 3 on 1, or GASP a breakaway). In addition to better defense, moving in tandem with your defenesive partner allows for more scoring opportunities and better D to D passes.
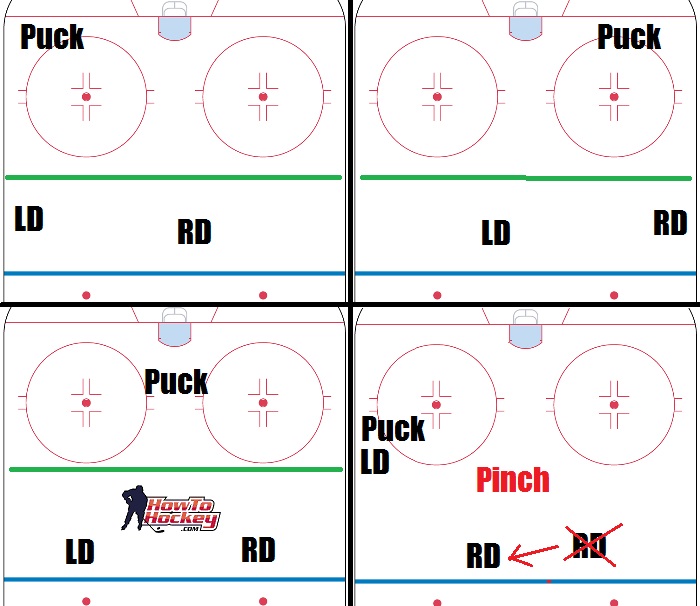
You can see that in the first three diagrams the defense moves together, and fairly evenly spaced. I’ve drawn a green line which marks the “safe zone”. Anywhere above this green line the defense generally has free roam. The positioning of the letters are not exact this is a general position and it can vary depending on the situation.
What to do when the defense pinches – It’s very important to understand what to do when your defensive partner pinches. You need to move to the center of the ice and retreat a little so you will be in a good position if the pinch does not work. Depending on the situation you may need to retreat out past the blue line in order to prevent a breakaway and keep it a 2 on 1. If you’re too aggressive it can lead to an opponent slipping behind you and getting a breakaway pass.
Keeping the puck in
You can use anything to keep the puck in. Your stick, hand (don’t close your hand on the puck, but you can bat it down) your feet, knees, or butt. The best way to stop a puck that is coming up the boards is to form a complete seal with your skate, legs, and backside, stop the puck, then play it with your stick.
When to retreat
You don’t need to always hold the blue line. If the other team gains clear possession of the puck, and is moving out of the zone with multiple passing options – retreat. It’s better to stay safe with a 3 on 2, rather than pinch and end up with a 3 on 1, 2 on 0 or breakaway.
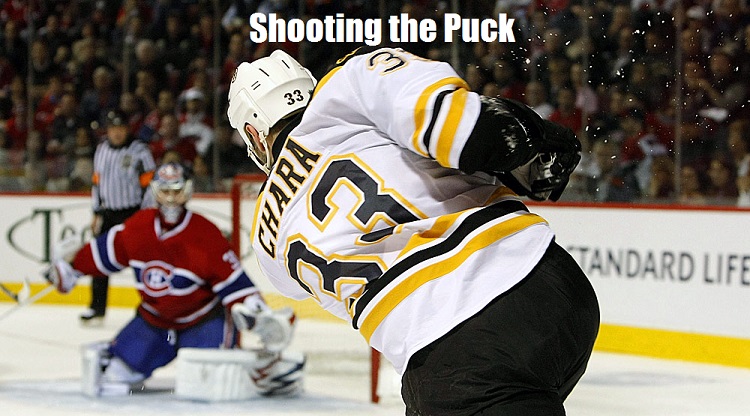
Shooting the puck
As a defenseman your bread and butter is the slapshot, one-timer and wristshot. Typically you want the puck hard and low to make it through traffic. Your best scoring chances will come closer to the center, and closer to the net. You won’t score many right against the boards on the blue line! Take a few strides in if you can for a better scoring chance.
Some defensemen get the puck off the boards and then instantly shoot it. This is a bad idea for a few reasons, one you are further from the net, and it’s an easy save for the goalie, and two, it’s likely you will miss and have the puck rim hard around the boards and out of the zone, or into the corner away from the net. When you get the puck at least take a stride off the boards before getting your shot off. It allows you to evaluate a pass, get some momentum, and get into a better shooting position.
To give you an idea where some top NHL defensemen shoot from I’ve created these charts below. They show a heat map of shots and goals. I made one for regular strength, and one for the power play
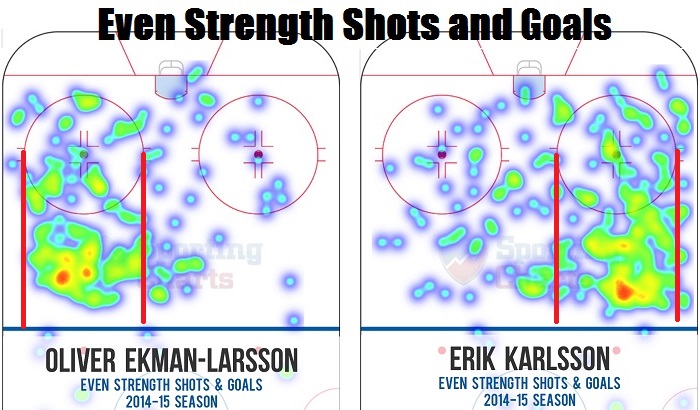
You may be surprised to see shots from a defensemen all over the ice, but we do see some trends here. I’ve drawn some lines to show the area above the circles and you’ll notice most shots are taken from this area. This gives you a general idea as to where defensemen spend most of their time, but what about all the other spots? I have four comments about that
- These are NHL defensemen, they can afford to be a little more aggressive (it’s a game so I encourage you to deviate a little as well to find your playing style)
- Hockey is dynamic, so you never know where you might find yourself depending on the situation. Some of these may have been a quick dash to an open puck, a shot, then a return to their position
- Skilled players and skilled team mates allow players to rotate positions and deviate a bit more from their position. The better you are, the better your chance of scoring from anywhere on the ice. If you have great team mates you can take a rush, or carry the puck deep in the zone, because you know one of your team mates will cover you.
- The is offensive positioning, so in most cases the respective teams had good possession of the puck. If we had a heat map of the offensive zone when the other team had the puck, the map might look a little different.
Defensive Zone play in the Neutral Zone
The two most common scenarios for defensemen in the neutral zone are defending an attack after a breakout from the other team, or a regroup / counter after regaining possession in the neutral zone.
Defending the attack in the Neutral Zone
The enemy is advancing, what should you do? The answer is…. it depends. Let’s go through some scenarios
- The other team has poor possession, and not much support and your defensive partner is in good position – This might be a good time to make a move and try to strip the attacker off the puck early.
- The other team is breaking out with good support and possession – Typically the defense will retreat into the neutral zone and get into good defensive position to slow the attack. This gives the forwards a good opportunity to back check. Both defense will be inside the dots (see my defense 101 video for more details) and trying to maintain a good gap (see my 1 on 1 defense video for more details). Some coaches like you to stand the attacker up at the blue line and be aggressive, but others prefer to keep the players to the outside, let them gain the zone, angle them into the boards and hopefully initiate the breakout.
- The other team is breaking out, and your defensive partner is out to lunch – In this scenario you retreat while moving towards the middle of the ice, but shading towards the puck carrier. If you are caught too far to one side or the other it gives too much ice to the other team to make a play and get a breakaway.

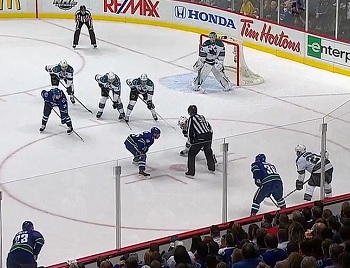
Lets take a quick look at the picture above.
- D1 (closest to the puck, or first D back) is responsible for the puck carrier and closing the gap (space between him and the puck carrier). He’s attempting to angle the puck carrier to the outside by holding the inside of the ice. He will back into the zone, while closing the gap to attempt a forced dump in or shot from a distance from the net
- D2 is checking CHI71 his stick is in front to attempt to block a pass, but he also wants to have good body position to prevent CHI71 from easily getting past him and to the net uncontested. D2 is also holding the inside of the ice while retreating into the zone
- Notice D1 and D2 are both inside the dots (faceoff dot markings on the ice) to force opponents to the outside
- F1 (first forward back) is back checking hard to check CHI88. The responsibility of the first forward back is to pick off a man and basically ride him into the zone to take away a chance at a pass to the high man
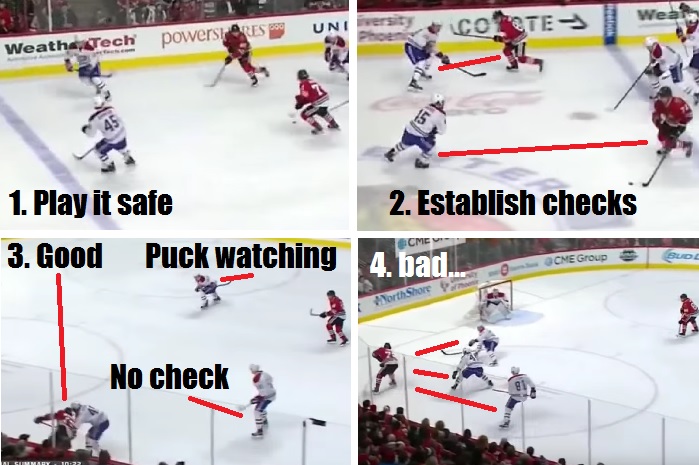
The above is a good example of retreating to the neutral zone gone bad.
- The opponent has good possession, this is a bad time to pinch because it could result in a 2 on 1 or 3 on 1 so both D retreat to establish their checks.
- A good start to regaining possession.
- D2 is puck watching and drifting from his check, F1 hasn’t established a check and is lost
- D2 and F1 both decide to help D1 which leaves two opponents wide open (one is off screen) in a high percentage scoring area (Patrick Kane scores here)
Regrouping and counter attack in the Neutral Zone
A regroup happens when your team recovers the puck in the neutral zone, regroups, and then initiates the attack. This can happen after intercepting a pass, taking the puck off the opposing team, or winning a foot race to the puck after a clearing attempt.
For a good regroup a defenseman should have good heads up awareness and be aware of his team mates on the ice. A common regroup play is to start with a D to D pass, so if you’re the defensemen without the puck GET OPEN. Using a D to D pass to initiate a regroup helps open up some ice, rather than trying to make a pass from the strong side where the other team has established their checks. Being able to skate backwards with your head up while handing the puck is a crucial skill to have for a successful regroup.
Regroup vs Counter
The difference between a regroup and a counter is the time it takes to move the puck up ice again. A counter attack happens very quickly and can result in more scoring chances. A regroup takes more time and requires the team to set up.
The faster you can move the puck up ice, the better chance you have to catch the other team by surprise and get a good scoring chance.
Defensemens role on the faceoffs
The defense play a very important role on the faceoff. A well planned faceoff can result in a quick scoring opportunity, but EVERYONE needs to know what their role is.
- In the offensive zone
- Both defense should be in a position to receive the puck off the faceoff. Sometimes defense will switch spots on the faceoff to set up better for the one-timer. Be on your toes and ready to move because the puck won’t always come clean back.
- If the faceoff is lost your job is pretty simple, just stay in a good defensive position as you normally would when the other team has the puck. If you’re the weak side defense (middle of the ice) you may need to haul ass over to the far boards. A common breakout play for the other team is to win the puck back, rim it hard for the winger, and the winger skates full tilt to pick the puck up. If you’re not ready, the other team may get a break away.
- If the faceoff is won – The strong side defense (closest to the boards) typically receives the puck and makes a quick D to D pass.
- In the neutral zone
- If the faceoff is won back to the defense the D will look for open players to move the puck up ice. Backwards skating is important to buy a bit more time. D to D passes are common
- If the faceoff is lost play defense as normal
- In the Defensive Zone
 If the faceoff is won we are looking to clear the zone quickly. Typically only one defenemen will be behind the “line of scrimmage” with all other players squaring up along the hashmarks. The center, defense, and winger will briefly tie up the other teams players, while the other winger will break for the weak side. Typically the defense will look to make a play to this breaking winger. The puck can also be moved up the strong side.
- If the faceoff is lost one winger should be challenging the shooter, the defensemen who was lined up at the hashmarks will cover the net zone, and the defense who was closest to the boards will tie up a man and move into good defensive positioning.
In closing, as a defenseman you will be watching plays unfold, and controlling the flow of the game. You will direct and influence the other team when they have possession, and help your team initiate offense. You will battle hard, skate well, and communicate well with your team mates and defensive partner. Many defensemen enjoy stopping a player on the other team from scoring, just as much as a forward enjoys putting one in the net.
That’s all for now. If I missed anything or you have questions please let me know in the comments below. This is a live article so I will come back and tweak it from time to time based on suggestions and comments. Thanks for reading and sharing.
If you’re looking for more ways to improve your hockey skills, check out The Pond. The Pond is our all in one hockey training platform designed to continually challenge players. We provide you with the most efficient path to improve the skills you will use the most in game. Use coupon code TRYOUTS to get your first month 100% free!